The Ultimate Guide to Your first Planted Tank

Above: Authors 30 gallon aquarium
Your First Planted Tank – Your Journey Begins
I wish someone had handed me a no-nonsense guide when I started my first planted tank. After years of experience, countless mistakes, and many thriving tanks later, I’m here to give you exactly that – a straightforward guide to creating your first planted aquarium.
Let’s get one thing straight: a planted tank is different from just throwing some plastic plants into an aquarium. It’s a living system where plants do much more than look pretty. They help keep your water clean, provide hiding spots for fish, and create a slice of nature in your home. But here’s the thing – while it might look complex, you don’t need a biology degree to succeed.
You’re probably wondering what makes planted tanks special. Unlike regular aquariums, plants are the stars of the show here. They need specific lighting, nutrients, and care. Think of it as an underwater garden that happens to have fish in it. And just like a garden, it needs the right balance of light, nutrients, and maintenance to thrive.
This guide cuts through the confusion you might find online. I’ll walk you through:
* Exactly what equipment you actually need (and what you can skip)
* How to set everything up the right way from the start
* What to do when things go wrong (because they sometimes will)
* How to maintain your tank without it becoming a second job
* Ways to level up your skills once you’ve got the basics down
(This includes learning about the 10 worst aquarium plants you can buy)
I remember being overwhelmed by technical terms and conflicting advice when I started. So I’m writing this guide to be clear, practical, and most importantly, useful for someone starting their first planted tank. Ready to get started?
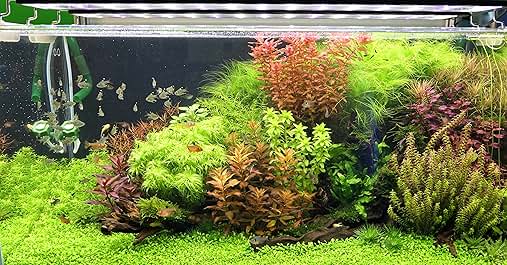
Plant Heavy
By doing this you get no algae and a beautiful look. Tap this link or the image above to view Amazon aquarium plant bundles. Buy the largest you can afford because you will lose a few.
Planning Your Tank
Planning is the foundation of every successful planted tank. Before you dive in, let’s get the crucial decisions right.
Choosing Your Tank Size
It can be quite tempting to start with the smallest tank possible. This is the worst decision you can make. Larger tanks are actually more forgiving for beginners. The increased water volume creates a more stable environment, giving you more room for error. A 20-30 gallon tank hits the sweet spot between stability and manageability. Tanks bigger than that are better in the long run but they will stretch your budget significantly. While you can go smaller if space is tight, remember that smaller tanks require more frequent attention to maintain their balance.
Finding the Perfect Location
Here’s something hobbyists only discover after it is too late – an aquarium is really heavy. Water weighs about 10 pounds per gallon and then there is the weight of the glass, the substrate, the plants and everything else you will be putting in the tank. Once it is set up, it is nearly impossible to move without emptying everything and . Find a spot away from direct sunlight to avoid algae problems, and make sure your floor can handle the weight. You’ll need easy access to electrical outlets and enough space around the tank for maintenance. The surface must be level, or you’ll need to level it yourself. Trust me, nothing’s worse than setting up a tank only to realize you can’t reach the back or that sunlight hits it directly in the afternoon.
Understanding Lighting Requirements
Lighting is the backbone of planted tanks. It is what will make or break your interest in the hobby. Forget about using natural sunlight for your plants. It’s uncontrollable and usually leads to algae problems. Instead, plan to invest in proper aquarium lighting. While we’ll cover specific equipment later, understand that lighting will be one of your most important investments.
Budget Planning
A proper planted tank setup requires some investment, but you can be strategic about it. Your non-negotiables are quality lighting, good substrate, basic test kits, and a reliable filter. These form the foundation of your tank’s success and are difficult or impossible to upgrade later. Other items like CO2 systems, fertilizers, and specialized tools are optional during the initial stages of the hobby. You can start basic and then upgrade as you progress.
Time Commitment
Be honest with yourself about how much time you can dedicate. You’ll need about 10 minutes daily for feeding and checking on things, a couple of hours weekly for water changes and basic maintenance, and a few hours monthly for deeper cleaning and plant trimming. The initial setup takes a full day, followed by 2-4 weeks of cycling before adding fish. While this might sound intensive, you’ll develop efficient routines as you gain experience.

Essential Equipment
Starting a planted tank isn’t about buying everything at once. Instead, think of it as building a foundation with the right essential pieces. While you’ll see fancy equipment in online photos, you can create a stunning planted tank with just the core essentials. Let’s break down what you actually need versus what’s nice to have.
Tank and Cabinet
Let’s talk tanks first. You’ll see both rimless and standard rimmed aquariums in planted tank setups. Rimless tanks give you those clean lines and unobstructed views, perfect for nature-style aquascapes. But they cost more and require extra care during maintenance. Standard rimmed tanks? They’re workhorses – reliable, cost-effective, and just as capable of growing stunning plants.
Tank shape matters more than most people realize. Standard length-to-height ratios work best for plant growth. While tall tanks look impressive, they make maintenance a pain and force you to buy stronger lights to reach the bottom. A tank around 18 inches high gives you the sweet spot – enough height for dynamic scapes, but still easy to work in.
Now for what sits under your tank. First-timers often focus entirely on the tank and overlook this crucial bit. Whether you choose a commercial aquarium stand, a cabinet-style unit, or build something custom, it needs to handle some serious weight. That water-filled 40-gallon tank? It’ll weigh as much as three adult men. The structure needs to support this weight evenly, without wobbling or warping.
Here’s a key detail veterans wish they’d known earlier: your support system needs to be level. Not mostly level – perfectly level. Even slight tilts can stress your tank’s seals over time. If you’re setting up on an older floor, you might need to shim the stand. Keep your spirit level handy during setup.
Don’t forget about access and storage. You’ll accumulate supplies over time – tools, fertilizers, food, spare parts. Commercial aquarium stands usually account for this with cabinets or shelves. If you’re going custom, plan for storage space. Also, think about maintenance access – you’ll need to reach all corners of your tank and possibly hide equipment like filters and CO2 systems.
Lighting System
For planted tanks, lighting is critical. You’ll need a full-spectrum LED light that provides the right PAR (Photosynthetically Active Radiation) values for plant growth. Look for lights with adjustable intensity and built-in timers. The light should cover your entire tank length, and for most beginner setups, you want something providing moderate light – around 40-50 PAR at substrate level. Avoid budget LED strips marketed for fish-only tanks; they simply won’t grow plants effectively.
Filtration
Forget about internal filters – they take up valuable planting space. A good canister filter rated for 4-5 times your tank volume is ideal. You want one with separate media baskets and space for both mechanical and biological filtration. The intake and outflow should be adjustable to create the right amount of surface movement without causing too much turbulence for your plants.
Heating and Temperature Control
Get a heater rated for your tank size plus 25% extra capacity. Digital temperature controllers are worth the investment – they prevent heater malfunctions that could cook your tank. Position your heater near your filter output for better heat distribution. Most tropical plants do best between 75-78°F (24-26°C).
Water Movement
Besides your filter output, you might need additional powerheads or circulation pumps. Plants need good water movement to transport nutrients and CO2, but too much flow will stress them. A good rule is to aim for gentle swaying of plant leaves – if they’re bent over, your flow is too strong.
CO2 System (Optional)
Let’s be crystal clear: you can grow a beautiful planted tank without CO2 injection. Many plants like Anubias, Java Fern, Cryptocorynes, and various mosses thrive without additional CO2. If you’re just starting out, I strongly recommend beginning without CO2 – it’s one less variable to worry about.
If you decide to add CO2 later, a basic pressurized system includes:
– CO2 cylinder (5lb is a good starting size)
– Dual stage regulator with solenoid
– Bubble counter
– Drop checker
– Quality diffuser or reactor
Off site pdf: Elmers Aquarium Equipment Handbook


My pick for Best On Amazon for "Planted Aquarium Light":
Hygger Advanced LED Aquarium Light
Choice was based on:
⇒ Number one is that I own three of these lights. They are tried and true.
⇒ Great reviews: 4.5 stars, 3247 total reviews
⇒ Programmable
⇒ Tap this box to view current price

Tap this box to view current price.
Understanding Water Chemistry
Don’t let the word “chemistry” scare you off. While it might sound like you need a lab coat and goggles, understanding your tank’s water chemistry is more about observation and common sense than complex science.
The Basics You Actually Need to Know
Your tank’s water is the environment where everything lives and grows. Think of it like the soil in a garden – get it right, and your plants thrive. Get it wrong, and you’ll fight an uphill battle. The good news? You only need to understand a few key parameters.
Let’s start with pH. It’s a measure of how acidic or alkaline your water is, typically ranging from 6.0 to 7.5 in planted tanks. Most plants aren’t picky about exact pH values, but they hate sudden changes. What matters more is keeping it stable. This is where KH (carbonate hardness) comes in – it acts like a buffer, preventing pH swings. Even if someone tells you the ‘perfect’ pH for a specific plant, a stable pH is always better than chasing an ideal number.
GH, or general hardness, tells you how much calcium and magnesium is in your water. These minerals are like vitamins for your plants. Very soft water (low GH) might need some mineral supplements, while very hard water might limit your plant choices. But here’s what most guides won’t tell you – most plants adapt perfectly fine to your local water conditions, as long as they’re not extreme.
Water Changes and Preparation
Your tap water probably contains chlorine or chloramine – both toxic to beneficial bacteria. Always use a good water conditioner when doing water changes. Let new water reach room temperature before adding it to your tank. Some folks age their water for 24 hours before use, but with modern water conditioners, this isn’t strictly necessary.
Small, regular water changes work better than large, infrequent ones. They’re less stressful for your plants and fish, and help maintain stable parameters. Aim for 20-30% weekly when starting out. Once your tank matures, you might get away with less frequent changes, especially if your plants are growing well.
The Nitrogen Cycle – Your Tank’s Foundation
The nitrogen cycle isn’t just some biological process happening in the background – it’s your tank’s life support system. Let’s break down exactly how to cycle your new tank before adding any fish.
First, what’s actually happening? When fish waste, uneaten food, and plant matter break down, they release ammonia. In a mature tank, beneficial bacteria convert this toxic ammonia into nitrite (also toxic), and then different bacteria convert this nitrite into nitrate (much less toxic and great plant food). Your goal is to build up these bacterial colonies before adding any fish.
Here’s exactly how to cycle your tank:
Start by setting up your tank with substrate, hardscape, and equipment running. The filter is crucial here – it’s where most of your beneficial bacteria will live. Add your plants right away – they’ll help stabilize the cycle and give the bacteria more surface area to colonize.
Now you need an ammonia source. You have two options: using pure ammonia (look for janitorial-grade ammonium hydroxide without surfactants or perfumes) or using fish food. Pure ammonia is more controlled – add enough to reach 2-4 ppm (your test kit will measure this). If using fish food, add a pinch every day and let it decompose.
Test your water daily. You’ll see ammonia rise first. After a week or two, nitrite will appear as the first type of bacteria develops. Keep adding your ammonia source. Eventually, you’ll see nitrite levels drop and nitrate levels rise – this means your second bacteria type is working. When you can add your ammonia source and see it convert fully to nitrate within 24 hours (zero ammonia, zero nitrite), your cycle is complete. This usually takes 3-6 weeks.
Don’t rush this process. A fully cycled tank means healthy fish and fewer problems down the line. During cycling, you might see bacterial blooms making your water cloudy – this is normal and will clear up. Keep your filter running continuously and don’t add any products claiming to “instantly cycle” your tank. They might add some bacteria, but they can’t instantly create a mature ecosystem.
Once cycled, start with a few hardy fish. Every new fish adds to the bioload, so stock slowly to let your bacteria colony adjust. Keep testing regularly until you’re fully stocked and seeing consistent readings.
Testing Your Water
Once the tank is cycled, you don’t need to test every parameter daily. Get a good test kit for the basics: pH, ammonia, nitrite, nitrate, and KH/GH. Test more frequently when setting up your tank or if you notice problems. Once your tank is stable, weekly or even bi-weekly testing is usually enough.
My pick for Best On Amazon for "Tiger Lotus":
Red Tiger Lotus
from Markus Fish Tanks (An Amazon aquarium plant store)
Choice was based on:
* Includes 3 bulbs
* Seller is very customer oriented
* This plant has a rating of 4.6 stars from 114 reviews(!)


Tap this box to view current price.
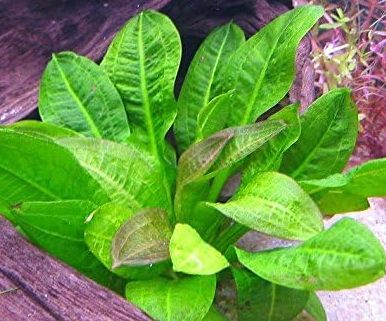
My pick for Best On Amazon for "Amazon Sword Plant":
Amazon Sword Plants
From "Water Plants"
(An Amazon aquarium plant store)
Choice was based on:
* Includes 3 plants
* Amazons number one best seller in live aquarium plants
* This plant has a rating of 4.1 stars from 1699 reviews(!)
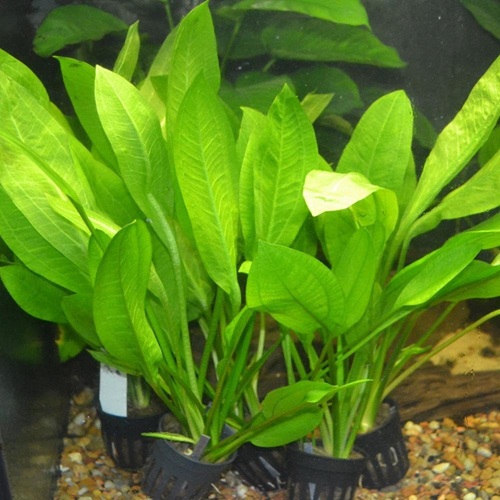
Tap this box to view current price.
Substrate and Hardscape
Every stunning planted tank begins with what goes under and around your plants. Getting your substrate and hardscape right is like building a house – mess up the foundation, and everything else becomes much harder.
Understanding Substrate Choices
Planted tank substrate isn’t just gravel from the pet store. You’ve got several options, each with its own pros and cons. Nutrient-rich active substrates like ADA Amazonia or Tropica Soil come packed with everything your plants need, but they’ll lower your pH and need replacing every few years. Inert substrates like sand or gravel are stable forever but rely entirely on water column fertilization.
Want the best of both worlds? Layer your substrate. Start with a nutrient-rich base layer, cap it with something inert like sand. This gives your plant roots access to nutrients while keeping maintenance simple. Just remember – once you pick a substrate system, you’re pretty much stuck with it unless you’re willing to tear down the entire tank.
Hardscape Materials
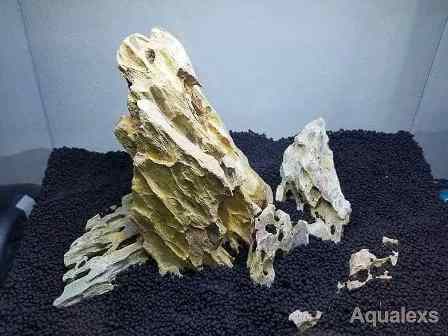
Rocks and wood aren’t just decorative – they’re functional elements of your tank’s ecosystem. Seiryu stone looks stunning but raises hardness and pH. Dragon stone creates amazing structures but can be sharp on bottom-dwelling fish.
For wood, you’ve got options like spiderwood, manzanita, and Malaysian driftwood. Each brings its own character – spiderwood’s delicate branches create natural-looking layouts, while Malaysian driftwood lowers pH and releases tannins. Whatever you choose, cure it properly. Boil smaller pieces or soak larger ones for weeks, changing water until it stays clear.
Getting Your Layout Right
Here’s where many beginners go wrong – they put hardscape materials directly on the glass. Always start with a thin layer of substrate underneath. It prevents pressure points that could crack your tank and lets you adjust angles more easily.
Work from back to front. Your substrate should slope up toward the back – aim for at least twice the depth in back compared to front. This creates depth and helps waste collect where you can vacuum it easily. Support these slopes with hardscape to prevent them from flattening over time.
Create levels and areas of interest at roughly 1/3 points in your tank – this is way more pleasing to the eye than centering everything. And leave enough space between hardscape pieces for plants to grow. That perfect-looking layout will feel cramped once your plants fill in.
Remember – unlike houseplants, you’re creating something meant to be viewed from one side. That beautiful piece of wood might look great on your table, but think about how it’ll look through the front glass. Every rock and branch should lead the eye somewhere – there’s no room for random placement in a confined space.
My pick for Best On Glass Aqua – Aquarium Stones
Dark Blue Slate

“Dark Blue Slate is a flat stone that can be used for a variety of aquascaping styles, terrariums, vivariums, paludariums and more. Dark Blue Slate sports a deep color palette that becomes substantially darker when exposed to water. It is primarily a blue-ish charcoal color that includes random striations throughout. Its flatter shape makes it ideal for stacking, adding stability or creating a sturdy base underneath aquarium wood such as Malaysian Driftwood, Pacific Wood, Spider Wood and more. They can be broken down into smaller pieces and wrapped with aquarium mosses or used in other planted projects with ease.”
$17.99 for 5 lbs. Free shipping
Other stones available. Tap here it view.
Plant Selection and Care
Aquarium plants are like the cast of a play – each has its role and requirements. But unlike a play, you don’t need every role filled right away. Starting with a few reliable species and mastering their care will teach you more than trying to grow everything at once.
Choosing Your First Plants
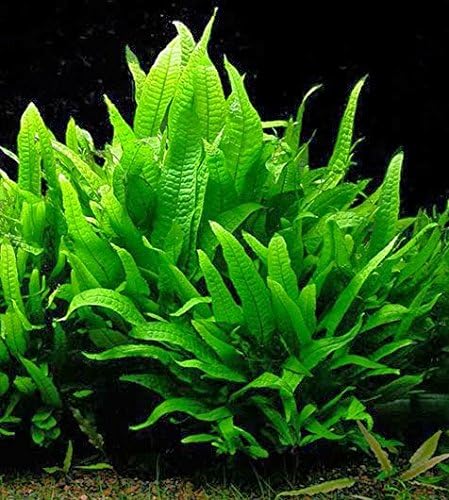
The best plants to start with are those that grow steadily but remain manageable. Anubias varieties (nana, petite, barteri) are excellent choices – they’re slow-growing, nearly indestructible, and stay compact. Java Fern varieties offer different leaf shapes and sizes while remaining easy to control. Cryptocoryne wendtii and parva stay relatively small and adapt well to most conditions.
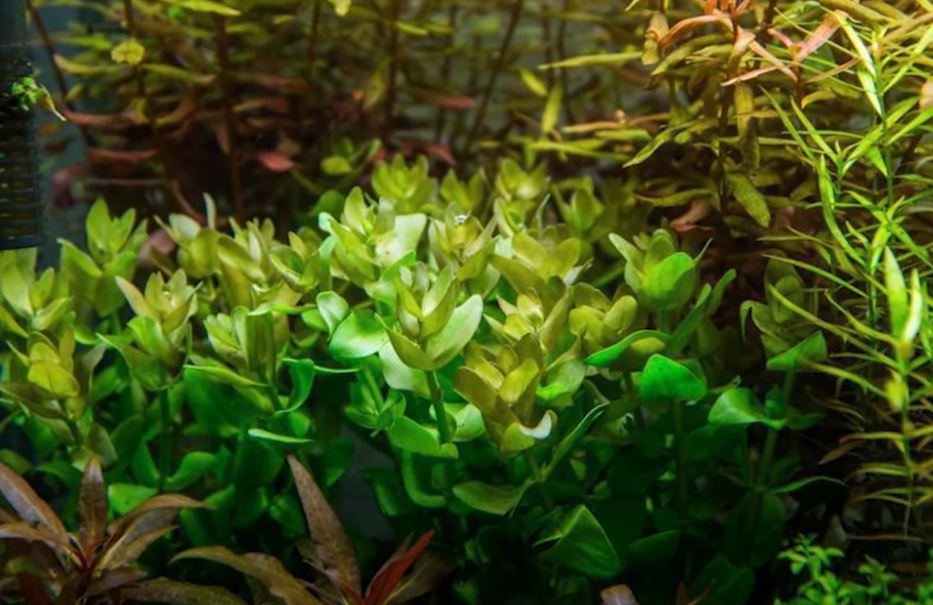
For mid-ground plants, Staurogyne repens grows steadily without becoming invasive. It can form beautiful bushes that don’t take over your tank. Bucephalandra species, while slow-growing and pricier, offer stunning leaf varieties and remain manageable.
For background plants, consider Limnophila sessiliflora or Pogostemon erectus – both grow upright without spreading aggressively and respond well to pruning. If you want something even easier, Vallisneria spiralis ‘Tiger’ or ‘Torta’ provide height while staying relatively contained.
Understanding Plant Categories
Plants generally fall into four groups based on how they grow:
Epiphytes (Anubias, Bucephalandra) attach to hardscape and shouldn’t be buried
Root feeders (Cryptocorynes) need rich substrate
Stem plants feed mainly from the water column
Ground covers that spread slowly and predictably
Each group needs different care and planting techniques. Don’t bury epiphyte rhizomes – tie or glue them to hardscape instead. Plant stem plants in groups where you want them to stay. Give root feeders enough space but choose species that won’t outgrow their spot.
Aquarium Carpeting Plants: The COMPLETE Guide to a PERFECT Carpet (Expert Tips!)
Planting Techniques That Actually Work
Clean your plants thoroughly before planting – remove any dead or yellowing leaves and rinse away shipping gel if they came in vitro. For stem plants, strip the lower leaves and plant deeply – at least 2 inches into the substrate. Plant in small groups rather than individual stems for better stability.
When attaching epiphytes to hardscape, use cotton thread or super glue gel (cyanoacrylate). The thread will eventually decompose, and the glue is completely aquarium safe once cured. Make sure rhizomes remain exposed to water flow.
For root feeders, create a small depression in the substrate, spread the roots out naturally, and cover them while keeping the crown (where leaves emerge) above the substrate level. This prevents rot and encourages healthy growth.
Understanding Plant Health
Healthy plants adapt to your water conditions, grow steadily, and produce new leaves regularly. Each species shows health differently – Anubias might only produce one leaf a month, while stem plants can grow noticeably each week.
Learn to read your plants:
– New leaves should be vibrant and defect-free
– Older leaves naturally age and can be removed
– Roots should be white or light-colored, firm, and growing
– Stems should be firm, not mushy
– Growth should be steady, not explosive or stalled
Maintenance That Makes Sense
Regular but minimal maintenance keeps plants healthy. Remove dead or yellowing leaves promptly – they only feed algae and waste nutrients. When pruning stem plants, cut just above a leaf node where you want new growth to branch. Let the tank stabilize between major pruning sessions.
Don’t constantly move plants around. Every time you disturb the substrate, you release trapped nutrients and debris. When you must replant, do it just before a water change to remove the stirred-up waste. If propagating stem plants, let cut tops float for a day to develop stronger roots before replanting.
Fertilization Basics
Even “easy” plants need some nutrients. In a new tank with nutrient-rich substrate, you might only need basic water column fertilization. As plants grow and substrate nutrients deplete, you’ll need more comprehensive fertilization.
Start with a basic all-in-one liquid fertilizer following the bottle’s instructions. Watch your plants’ response – healthy growth means you’re on track. If you see deficiencies (yellow leaves, poor growth), gradually increase dosing. It’s better to underfeed slightly than overfeed and trigger algae.
A Word on Growth Expectations
The most common mistake is expecting rapid growth. Slow, steady growth is healthier and more manageable than rapid growth. Your plants should look healthy and show consistent, if slow, development. This makes maintenance easier and keeps your tank stable.
Don’t feel pressured to fill your tank immediately. Starting with fewer plants that grow well is better than cramming in too many species at once. You can always add more plants as you gain experience and understand your tank’s conditions better.
Find out how I grow huge aquarium plants…
Think small: 11 Perfect Small Aquarium Plants For Your Nano Tank

Aquascaping Styles: Finding Your Inspiration
Before diving into setup, let’s explore different aquascaping styles. These aren’t rigid rules but rather guidelines that have evolved from years of aquatic gardening. Think of them as starting points for your creativity, not limitations.
Jungle Style
The most forgiving and natural-looking approach. Jungle style mimics wild underwater habitats, allowing plants to grow more freely. There’s still structure here – you’re creating organized chaos rather than actual chaos. This style works great for beginners because it’s adaptable and often requires less maintenance than more manicured styles.
Nature Style (Iwagumi)
Inspired by mountain landscapes, Nature style emphasizes simplicity and open space. Typically featuring distinctive stones as the main hardscape, with carpet plants and a few accent plants. While traditional Iwagumi follows strict stone placement rules, modern interpretations are more flexible. The beauty lies in its minimalism – creating impact with less rather than more.
Iwagumi Aquascape Guide: How to Design a Stunning Minimalist Aquarium Layout
Dutch Style
Born from traditional Dutch horticulture, this style is all about the plants. Think of it as an underwater garden with neat rows, defined borders, and careful attention to color and leaf texture. While classic Dutch aquascapes follow specific rules about plant streets and grouping, contemporary approaches focus more on the core idea of showcasing plant diversity through thoughtful arrangement.
Super detailed article on Dutch Style Plant Aquariums
Biotope
A biotope recreates a specific natural habitat – like an Amazon tributary or Asian stream. While true biotopes limit you to plants and hardscape from one location, modern interpretations focus more on capturing the feel of a natural habitat. It’s about creating a slice of realistic nature rather than a perfect replica.
Wabi-Kusa
Drawing from Japanese aesthetics, Wabi-Kusa celebrates imperfection and natural development. Usually featuring a focal point of emersed (above water) growth combined with submerged plants. This style teaches us that beauty can be found in simplicity and even imperfection.
Forest (Ryuboku)
Using wood as the primary hardscape, Forest style creates underwater landscapes reminiscent of flooded forests. Driftwood pieces become tree trunks, while plants add depth and context. Modern interpretations range from dense woodland feels to sparse, elegant arrangements.
Practical Takeaways
Remember, these styles aren’t exclusive boxes – many successful tanks blend elements from different approaches. Start with what appeals to you visually, but don’t feel constrained by traditional rules. Your tank should reflect your taste and adapt to your maintenance comfort level.
Most importantly, let these styles inspire rather than restrict you. Some of the most stunning tanks break traditional rules while respecting fundamental principles of design and plant growth.

The Setup Process: From Empty Tank to Thriving Ecosystem
Before starting, gather all your equipment and materials. Nothing’s worse than having a half-setup tank and realizing you’re missing something crucial. Let’s break this down into clear, manageable steps.
Step 1: Location Preparation (Day 1, Morning)
Clean your chosen location thoroughly
Place and level your stand – use a spirit level, not eyeballing
Check nearby electrical outlets work and can handle your equipment
Lay out all your equipment and materials for easy access
Keep paper towels and a bucket handy – there will be spills
Step 2: Tank Preparation (Day 1, Morning)
Clean your tank with just water – no soap or chemicals
Check all seals and corners for damage
Place your tank on the stand
Check leveling again – an unlevel tank will cause problems later
Mark your desired water level on the outside with tape
Step 3: Substrate (Day 1, Afternoon)
Rinse inert substrate types thoroughly if using
For soil-based substrates:
– Start with a thin layer of organic soil or aqua soil (1-1.5 inches)
– Add root tabs in planned plant locations
– Cap with 1-2 inches of fine substrate
– Slope gradually from front to back
Mist the substrate lightly – prevents clouding later
Step 4: Hardscape (Day 1, Afternoon)
Place larger rocks/wood first – they need to be stable under substrate
Build your main structure working from back to front
Leave adequate planting spaces between hardscape
Use substrate supports if creating height
Step back frequently to check the layout from viewing angles
Take a photo – helps spot imbalances
Once satisfied, gently mist again
Step 5: Planting (Day 1, Evening)
Start with background plants:
– Create small holes with tweezers
– Plant stem plants in groups of 3-5
– Plant deeply – at least 2 inches
Add mid-ground plants
Attach epiphytes to hardscape
Add foreground plants last
Mist frequently to keep plants moist
Step 6: Filling (Day 1, Evening)
Place a plastic bag or plate on the substrate
Pour water slowly onto the plate to prevent substrate disruption
Fill to about 25% and check for any floating plants
Replant anything that came loose
Continue filling slowly
Stop at your marked water level
Step 7: Equipment Setup (Day 1, Night)
Install filter:
– Prime it properly
– Position intake and output for good flow
Add heater:
– Place near filter output
– Wait 15 minutes before turning on
Position lights:
– Set initial period of 6 hours
– Time it for when you’re usually home
Install any additional equipment (CO2, etc.)
Step 8: Initial Cycling (Weeks 1-4)
Days 1-3:
– Run filter and heater
– Keep lights on reduced schedule
– No fertilizers yet
– Monitor temperature
Days 4-7:
– Begin testing ammonia, nitrite, nitrate daily
– Add beneficial bacteria starter
– Start light fertilization if using fast-growing plants
– Remove any melting leaves
Weeks 2-4:
– Continue daily parameter testing
– Weekly 25% water changes
– Trim any dead/melting leaves
– Watch for algae – reduce light if it appears
– Don’t add livestock yet
Step 9: Maturing Phase (Weeks 4-8)
Once cycle completes:
– Add cleanup crew first (snails, shrimp)
– Wait one week, monitoring parameters
– Add hardy fish slowly, few at a time
– Increase light duration gradually
– Begin regular fertilization schedule
Remember: patience during cycling is crucial. Don’t rush adding livestock, even if the tank looks ready. A proper cycle takes 3-6 weeks, but this patience prevents major issues later.

Troubleshooting Your Planted Tank
Every tank hits rough patches. The key isn’t preventing all problems – it’s knowing how to spot and fix them before they get serious. Let’s break down the most common issues you’ll face and how to handle them.
Algae – The Universal Challenge
Algae isn’t your enemy – it’s your tank’s warning system. Different types tell you different things. Green spot algae on glass usually means low phosphates. Brown diatoms in a new tank are normal and temporary. That dreaded hair algae? Usually caused by too much light and inconsistent CO2.
The trick isn’t nuking algae with chemicals. Instead, fix what caused it. Start by reducing light intensity or duration. Clean your filter, check flow patterns, and make sure dead spots aren’t trapping nutrients. Sometimes just removing excess fish food and decaying plant matter solves the problem.
Plant Health Issues
When plants struggle, look for patterns. Multiple plants showing holes in leaves? Probably potassium deficiency. New leaves growing in yellow? Iron might be low. But here’s what often gets overlooked – these issues usually aren’t about lacking nutrients. Poor water flow, buried rhizomes, or too much light can prevent plants from using available nutrients.
One common mistake is overreacting. Plants need time to adjust to your tank. Some melt-back is normal, especially with tissue-cultured plants or sensitive species. As long as you see new growth, be patient.
Green Thumbs for Green Tanks: 5 Expert Tips to Stop Your Aquarium Plants from Kicking the Bucket
Water Chemistry Swings
Sudden pH drops, rising ammonia, or unstable parameters usually have simple causes. Check your maintenance routine first – irregular water changes often trigger chemistry swings. If using CO2, verify it’s consistent throughout your photoperiod. Test your tap water too – seasonal changes can affect your tank.
Equipment Failures
Filter making noise? Probably needs cleaning or has trapped air. Heater acting up? Check the calibration and look for mineral buildup. CO2 inconsistent? Check for leaks around connections and clean your diffuser.
Keep basic spares of crucial equipment. A spare heater or filter media can save your tank during an emergency. Document your equipment settings – knowing your normal bubble count or temperature range makes troubleshooting easier.
Fish Health Problems
In planted tanks, fish problems often link to plant maintenance. Aggressive pruning can stress fish by removing hiding spots. Fertilizer overdosing can affect sensitive species. Always quarantine new plants and fish to prevent introducing diseases or pests.
The Nuclear Option
Sometimes tanks need a reset. If you’re fighting multiple issues despite trying everything else, consider the fresh start approach. Save your hardscape, healthy plants, and livestock in temporary housing. Clean everything, replace substrate if needed, and rebuild thoughtfully. It feels drastic, but it’s sometimes the fastest path to a healthy tank.
Prevention Better Than Cure
Keep a basic maintenance log. Note water change dates, fertilizer doses, and when you clean equipment. This makes spotting patterns easier when problems arise. Take regular photos too – they’re great for tracking slow changes you might miss day-to-day.
Make money keeping fish...
I do
Consider creating your own income producing website, just like I did with this one! I advertise Divi website creator, but you could place other ads on your website.
I've used Divi Wordpress website builder to build this site, and it's incredibly user-friendly. With its drag-and-drop interface, creating your own website becomes a breeze.
Simply tap this box to get started and see how easy it is to create a website with Divi.
The cost is $89/year. This is $7.41 per month. Divi comes with a 30 money-back guarantee. Try it at no risk.
Take this box to visit the Divi website to learn more. The link opens in a new window.

* Great Video: How to make a Website | Divi Tutorial 2024
Long-term Tank Evolution
A planted tank isn’t a painting – it’s a living system that changes and matures over time. Understanding these changes helps you work with your tank’s natural evolution rather than fighting it.
Natural Maturation
Your tank will hit its stride around the six-month mark. The substrate develops healthy bacterial colonies, plant roots create complex networks, and a natural balance emerges. You’ll notice maintenance becomes easier, plants grow more predictably, and the tank feels more stable. This is when many beginners make their first mistake – they start tinkering with a system that’s working.
Don’t chase the pristine look of newly set up tanks you see online. A mature tank has its own character – slightly weathered hardscape, plant growth that’s filled in naturally, and a lived-in feel that new setups can’t match. This maturity creates a more stable environment for both plants and fish.
Evolution of Plant Growth
Some plants will thrive beyond expectations, while others might struggle despite your best efforts. This isn’t failure – it’s your tank telling you what works in your specific conditions. Learn to adapt your plant selection to what grows well rather than forcing demanding species into unsuitable conditions.
Expect your original layout to change. Fast-growing plants might need relocation, slow growers could take months to show their potential. The key is making gradual adjustments rather than complete overhauls. Each small change should enhance what’s already working.
When to Rescape
Sometimes a tank needs a fresh start – but timing matters. Consider rescaping when:
– Plant growth becomes unmanageable
– The hardscape no longer serves its purpose
– You want to try a completely different style
– Substrate is breaking down (usually after 2-3 years with active soils)
Never rescape just because you’re bored. Instead, try small changes first – relocating a few plants, adding new hardscape elements, or removing overgrown sections. Complete rescapes stress livestock and reset your tank’s biological maturity.
Building Sustainability
A truly successful planted tank shouldn’t need constant attention. Aim for a system where:
– Plants grow at manageable rates
– Algae stays minimal without heroic efforts
– Fish and invertebrates breed naturally
– Water parameters remain stable between maintenance sessions
Taking all of this into account
Creating and maintaining a planted tank is both an art and a science, but it doesn’t have to be complicated. Success comes from understanding basic principles, being patient, and learning to read your tank’s signals rather than following rigid rules.
Remember these key points:
Start simple and build complexity as you gain experience. Focus on mastering the basics before trying advanced techniques. Work with your tank’s natural evolution rather than against it. Most importantly, enjoy the journey – every challenge teaches you something valuable about this fascinating hobby.
The best part? A planted tank is never truly “finished.” It grows, changes, and evolves with you. Each tank becomes a unique ecosystem shaped by your choices and care. Whether you’re creating a simple jungle style or an elaborate aquascape, the rewards come from watching your underwater garden thrive and sharing your experience with others.
Your first planted tank is just the beginning of an engaging and rewarding journey into aquatic gardening.
If you would like even more information I use Google Gemini A.I.
Tap this box to have this A.I. open in a new window.


Other pages on this site:
⇒ How to keep freshwater shrimp
⇒ 10 fast growing plants to help control algae in the planted aquarium
⇒ Taking photos of your aquarium using your smartphone
⇒ Aquarium Hobbyist Books & Gifts
⇒ My Top 3 Steps To Have Healthy Fish and A Healthy Aquarium
Planted aquarium guide